Several years ago my family was looking to cut the cord on cable TV to save some money.
At the time we were looking at a variety of over-the-air DVRs that we could buy that would allow us to record all of our favorite broadcast television programming.
A commenter on this site recommended that we check out the Tablo TV over-the-air DVR from Nuvvyo. We reached out to Nuvvyo, and they were kind enough to send out their original 2 tuner network DVR.
We did a full review of that device, and in the end we were so impressed with it that we kept it as our main over-the-air DVR and live TV streaming device. We’ve had it now for almost 7 years, and it’s still going strong. In short, we love it!
This month I heard from the folks over at Nuvvyo wondering if I’d like to do a review of one of their newer HDMI DVRs, and I jumped at the chance.
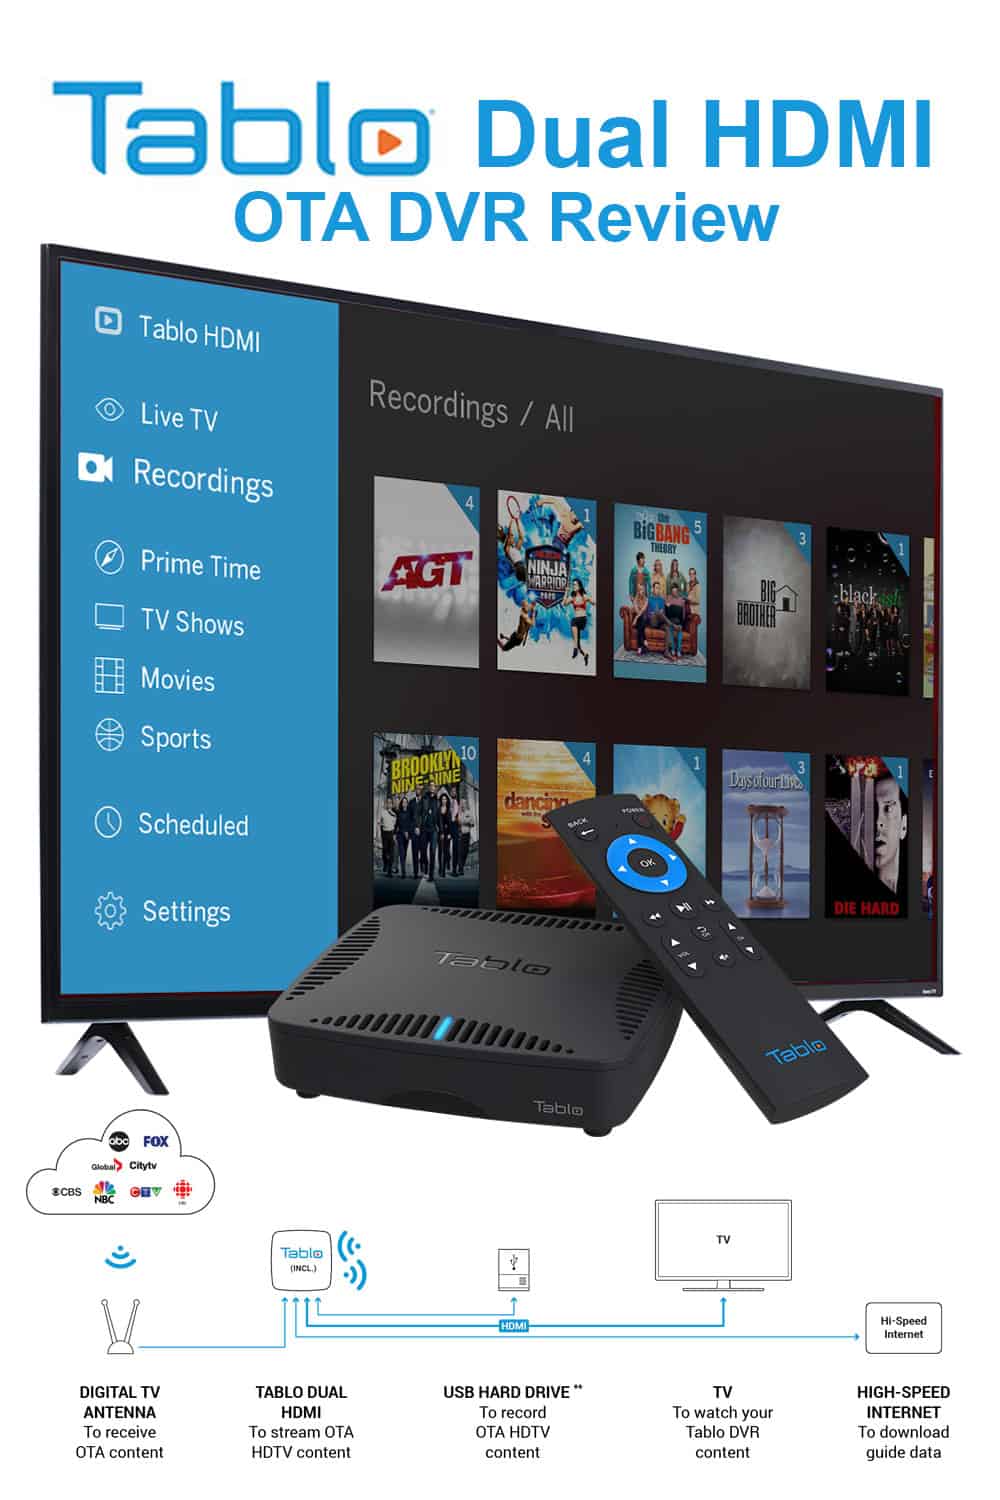
So today, we’ll be looking at a full unboxing of the new Tablo Dual HDMI OTA DVR.
Unboxing The Tablo Dual HDMI Over-The-Air DVR
So what does the Tablo Dual HDMI OTA DVR come with in the box? Here’s a complete list:
- Tablo DUAL HDMI OTA DVR
- Tablo Remote
- AAA Batteries (x2)
- Power Supply
- 5′ Ethernet Cable
- 5′ HDMI Cable
- Quick Start Guide
The only things that are not included with the device, that you will need to buy separately, include:
- A 1TB to 8TB USB hard drive (for recording shows or pausing live TV).
- An ATSC HDTV antenna, for bringing in the broadcast signal in your area.
Here’s a quick unboxing of the Tablo Dual HDMI DVR.
The Tablo Dual HDMI comes in a nicely designed box that lists all of the device’s features and benefits. It is HDMI connected and also includes a remote, unlike previous Tablo devices. It also includes an HDMI cable, and a network cable to hook it up to the internet for downloading TV guide data, firmware updates, cover art, etc.
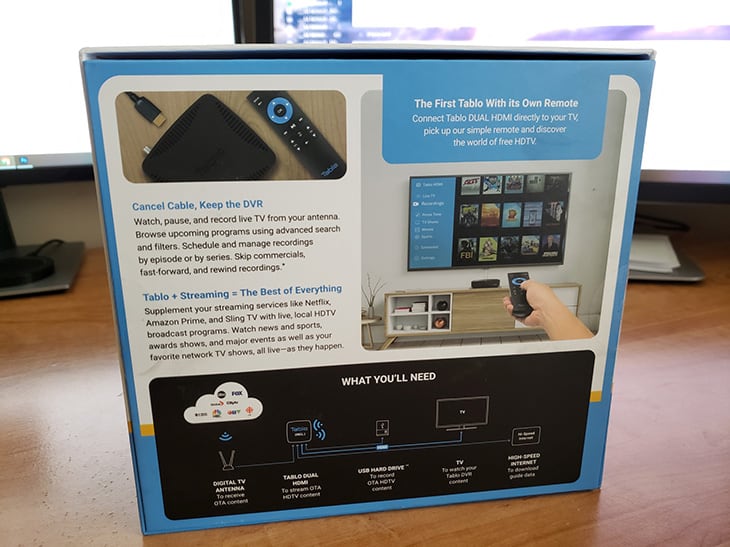
The back of the box shows what you’ll need to get started, and how the device is setup once you unbox it.
Here’s a first look at everything included in the box.
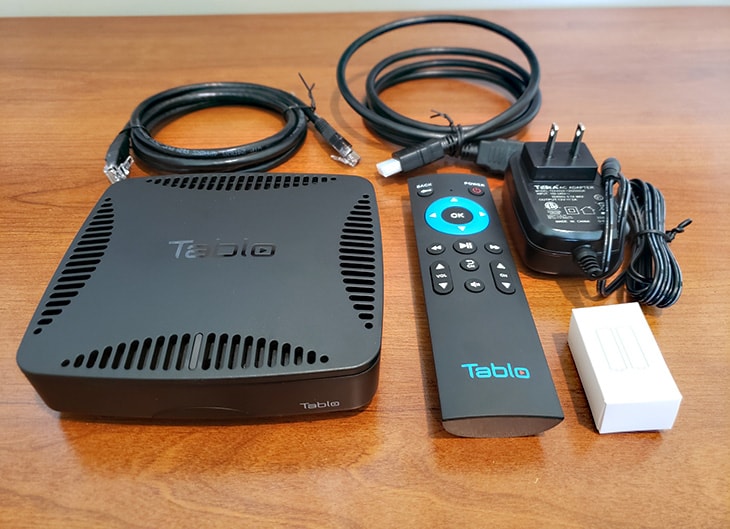
The Tablo box includes the Dual HDMI DVR device, a remote control, power cord, batteries for the remote, HDMI cable and a network cable.
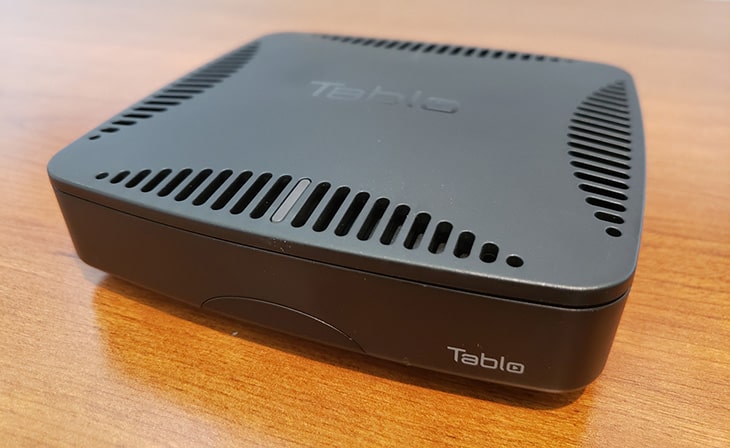
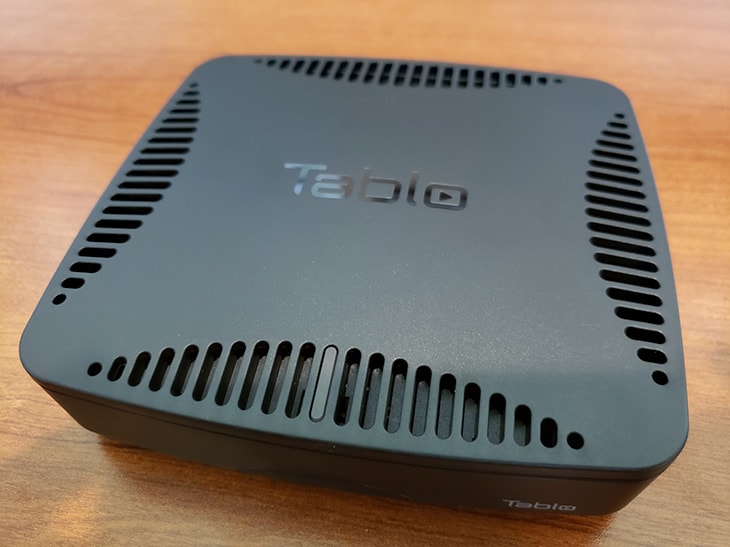
The device itself is pretty small. It has vented air holes on the top, a small blue LED light, and a small IR port on the front.
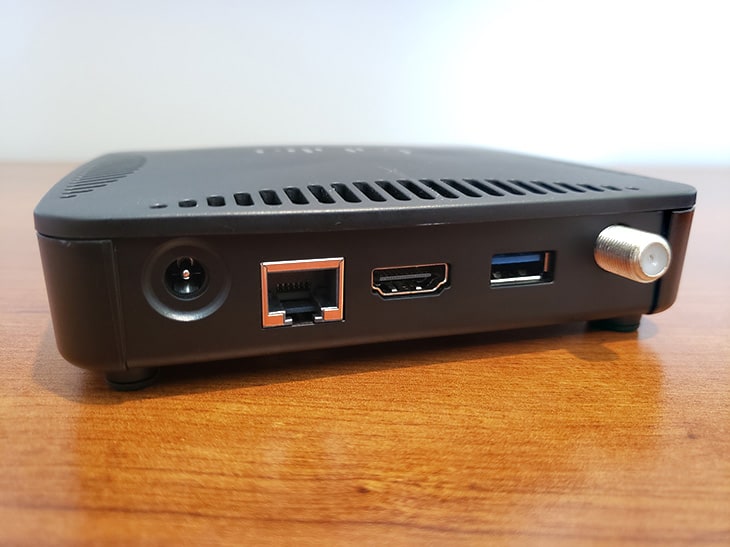
The back of the device has a power port, networking port, HDMI port, USB port for the hard drive and an antenna connection.
The device itself is pretty small, coming in at just under 1.5 inches in height, and just over 5 inches in length and width.
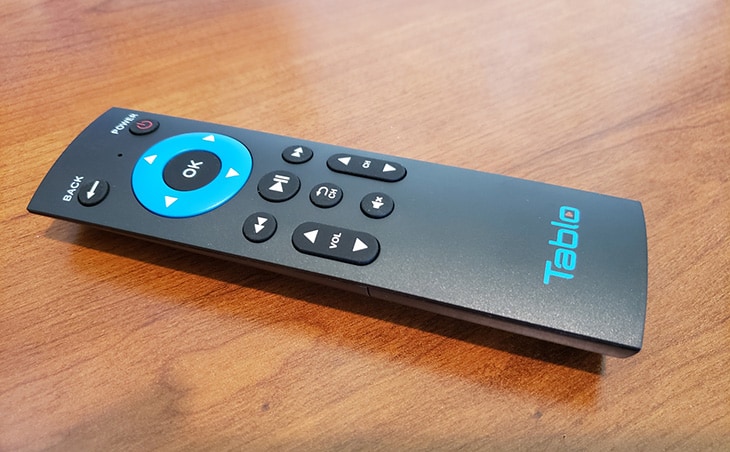
This is one of the first Tablo devices to include a remote control. All of the other DVRs Nuvvyo make are network devices that are controlled either by the app on the mobile device, or by that particular device’s remote (like Fire TV or Roku). In this case this device is meant to be hooked up directly to a TV, and as such it includes a remote for Navigating the Tablo DVR interface.
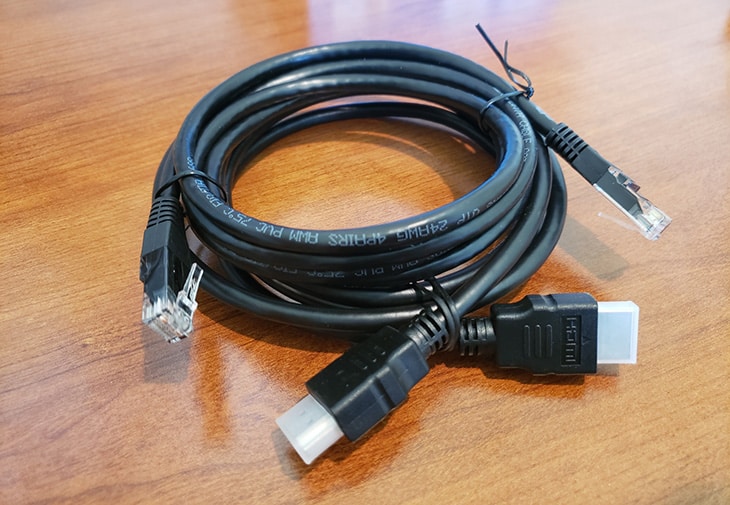
Below are the cables included in the box. You’ll need them when setting up your device. You’ll plug it directly into your TV’s HDMI port, and to the ethernet port if you have one available.
Tablo Dual HDMI Device Specs & Features
So just how big is the Tablo Dual HDMI DVR device?
- Size: Dual & Quad HDMI DVR: Height: 1.45″, Width: 5.31″, Depth: 5.15″.
- Weight: Dual Tuner: 228 g or 8 oz. Quad Tuner: 230 g or 8 oz.
When compared with the existing original Tablo device we already have, it’s about 1.5″ inches smaller in width.
The specs have also gotten better with more memory and a better processor. Here are a few of the specs for the new Dual HDMI device.
- 2 ATSC digital tuners. (4 tuners in the Quad device)
- 1 HDMI 2.1 port to connect to your TV.
- 10/100/1000 Gigabit ethernet port.
- 1 USB 3.0 port supporting up to 8TB in storage.
- 1 Coax antenna port.
- WiFi included: 802.11ac dual band WiFi with MIMO.
- Upgradeable firmware.
- Quad Core processor.
- 2GB RAM.
- 16 GB Flash.
- Audio Format: Stereo (PCM) audio or AC3 Passthrough (5.1).
- Video Format: MPEG2.
Tablo Dual HDMI DVR Features & Functionality
So what are some things that the Tablo Dual HDMI can do?
- Watch, pause and record live over-the-air TV.
- Record up to 2 shows at the same time.
- Schedule recordings (either manually or by using their premium guide service).
- View and manage existing recordings, by show or movie title.
- Skip commercials, either manually, or with their premium add-on “Automatic Commercial Skip” feature.
- Limited whole home streaming to secondary TVs using apps on compatible Smart TVs, Roku, Amazon Fire TV, & Android TV.
- View and record series of TV shows, movies, sporting events.
- View 14 days of rolling Live TV guide and show information (with add-on TV Guide data service) or 24 hours worth without premium subscription.
- Watch TV in the native MPEG2 – 1080i HD broadcast video quality.
Setting Up Your Tablo Dual HDMI Device
Setting up the Tablo Dual HDMI device is relatively simple. Here’s a quick video from the folks at Tablo, describing the process from start to finish.
Connecting The Tablo Dual HDMI To Your TV
To get started you’ll just put the batteries in the remote, and set the Tablo device near your TV so that it can be plugged in via HDMI.
Next, place your antenna in an optimal location and plug your antenna’s coax cable into the coax port on the back of your Tablo.
Your USB hard drive should be connected next. Make sure to place it next to your Tablo, and not on top. If placed on top it may restrict airflow which can cause it to overheat.
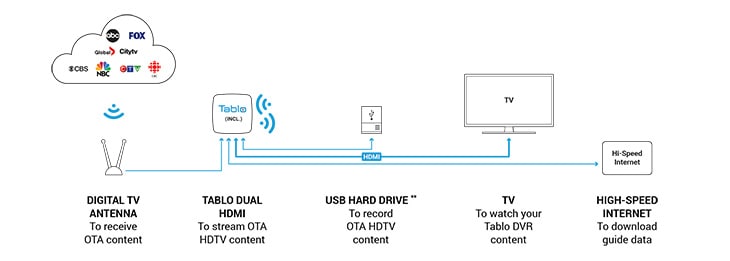
Next, plug one end of the HDMI cable into your TV’s open HDMI port, and the other end into the Tablo.
The ethernet cable can be plugged in next, if a hardwired connection is available. If not, then you’ll need to set up a WiFi connection during the setup process.
Lastly, you’ll plug in the power adapter. Once plugged in the Tablo Dual HDMI will turn on and the blue LED on top will light up.
Setting Up The Device
Once the device is connected and the TV is turned on the Tablo will begin the setup process.
First it will ask you to connect the device to the Internet. If you want to connect it via WiFi, it will ask you to select the correct network and enter your password.
Once your device is online it will check for firmware updates and ask if you’d like to install them. In my case it did find an update, which I agreed to install.
Once any firmware updates are installed it will take you through the process of connecting your TV antenna, and entering your zip code where the device will be used.
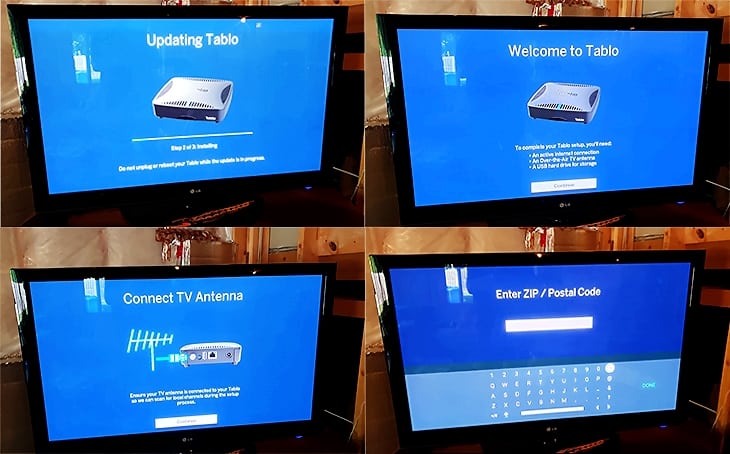
Once the device has scanned for and found all of the channels in your location you can choose which ones you want to appear in your TV grid guide. I typically leave the ones with a bad signal off of my channel list.
Once the channels are added it will walk you through formatting the hard drive to get it ready for use with the Tablo.
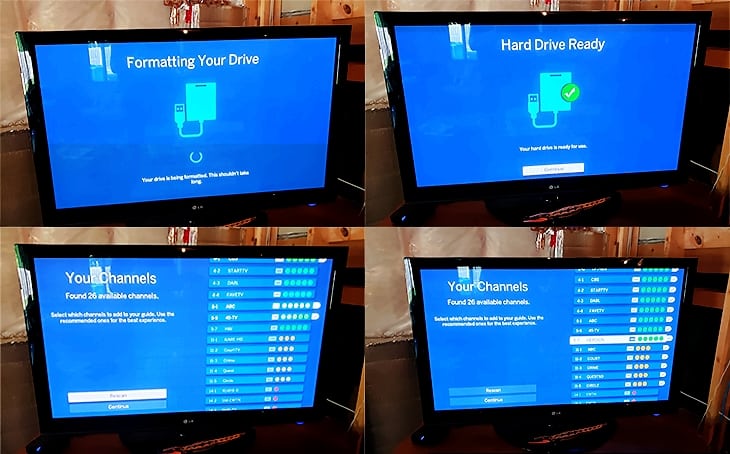
Once the hard drive is formatted the device is ready to go.
Every new device comes with a 30-day trial of the TV Guide Data Service, as well as the premium Automatic Commercial Skip subscription.
Things You Will Need To Use Tablo DVR
As you’ve probably already gathered from the above setup of the device, everything you need to get started is not included in the box. There are a couple of things you’ll need to purchase or have already to complete the package.
- Digital ATSC antenna and coax cable.
- USB-connected portable hard drive (USB 2.0 or 3.0, 1 TB to 8 TB in size). See their recommended drives post.
If you don’t already have an antenna or USB hard drive you will have to purchase those separately.
When I was setting up this device I already had an antenna that we have been happy with, the Mohu Curve (Now called Mohu Arc). We tend to recommend the antennas from Mohu as they’re American made and they have always worked well for us.
We also purchased a 2TB Seagate portable hard drive on Prime Day for about $30 or so.
So all in, you could expect to spend anywhere from $50-100 for a good antenna and a decent sized hard drive if you don’t already have spares laying around.
Using The DVR
Using the Tablo Dual HDMI device is simple. Just fire up your TV, and turn it to the correct input. You’ll see the main screen for the device where you can watch Live TV, view recordings, search for shows, or change device settings.
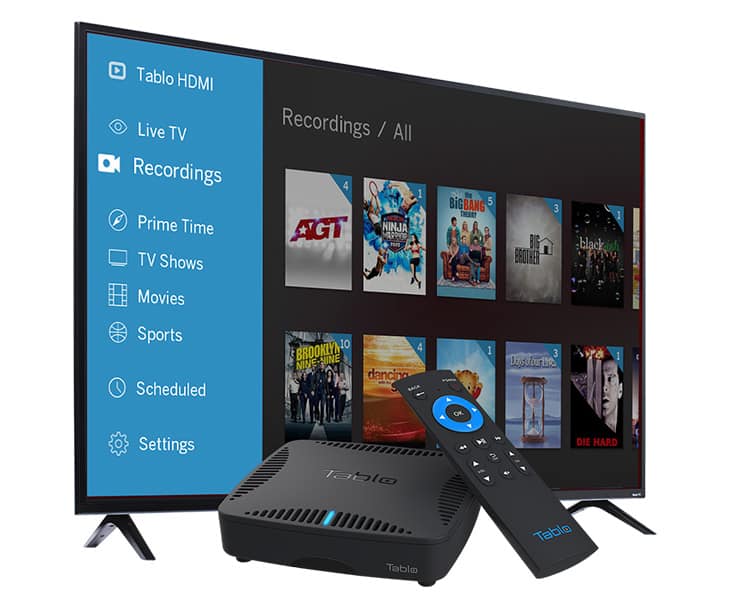
Typically when you turn the device on it will go directly to the “Prime Time” shows tab, but in the settings you can tell it which tab it should default to on startup. We set ours to go directly to the “Recordings” tab.
The different sections in the app will allow you to search for shows, watch live TV or manage your scheduled recordings or already recorded shows. Here are the different sections, and what you can expect to find in each.
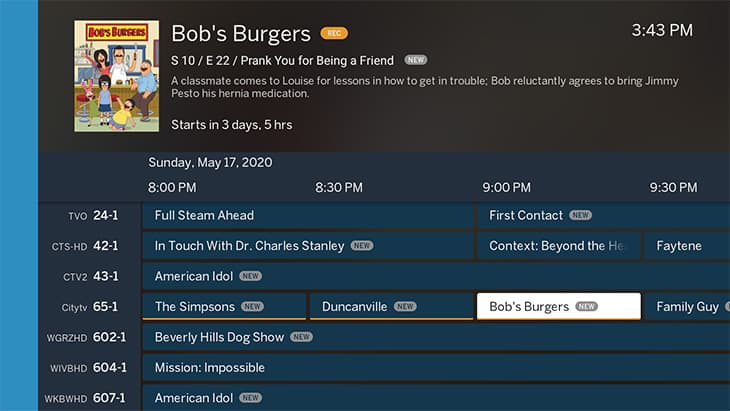
- Live TV: This tab shows you a Live TV grid guide that lists currently live and upcoming TV shows. By clicking on a particular TV show or movie you can get a synopsis of the program, record an upcoming show, set a series to record, and more.
- Recordings: This tab will show you a listing of your already recorded TV shows and movies so you can watch them.
- Prime Time: This will give a listing of prime time TV shows scheduled for the next 2 weeks in your market.
- TV Shows: A listing of all the TV shows in your market for the next 2 weeks.
- Movies: A listing of all the Movies in your market for the next 2 weeks.
- Sports: A listing of all the sporting events in your market for the next 2 weeks.
- Scheduled: This shows you a listing of shows you have scheduled to record, along with any conflicts that might arise if more than two shows are set to record at the same time.
- Settings: This is where you can change your device’s settings including device name, network settings, editing channel lineups, screensaver settings, setting up the remote, scheduling settings, and updating guide data if you think it needs a refresh.
Watching live TV on the Tablo Dual HDMI is pretty simple. Just turn on the TV and device, go to the “Live TV” tab, and click on the channel you want to watch.
If you want to know more about a live or upcoming show, or schedule a recording, just click on the show itself in the grid, and then click on “Info”. A window will pop open with full details about each episode, as well as allowing you to schedule a recording for all episodes of the show, or only new episodes. If you pay for the premium TV Guide Data, you can also set recordings to start early or end late (for sports for example), or set it to keep only a certain number of the most recent episodes. We use that feature to record one news station’s 3 most recent local newscasts.
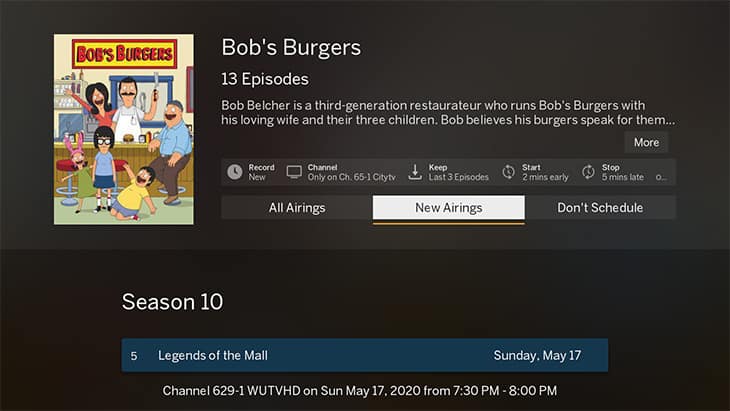
Once you have recorded a show it shows up in the “Recordings” tab, listed in alphabetical order. You can sort your recorded shows by most recent recordings, sports, TV shows or movies.
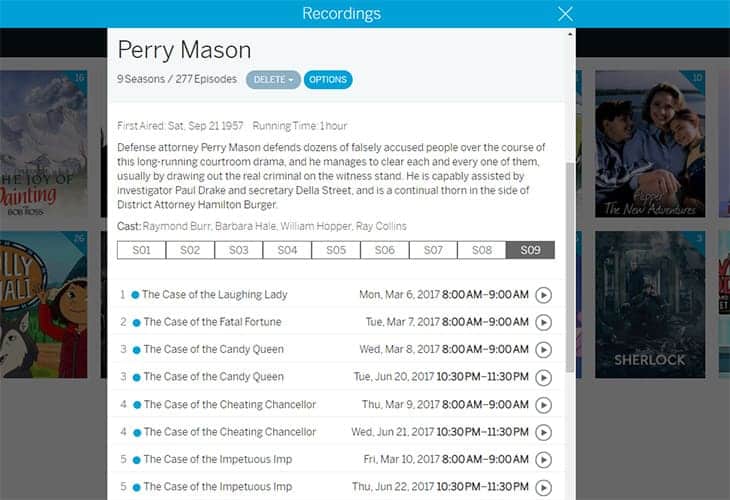
Once you click into a show it will have a listing of all the recorded episodes by season and episode number, along with a description of the show generally, and each episode individually.
For example, I enjoy watching the old Lawyer crime drama Perry Mason. I got hooked on it while watching it with my mother as a child. We have 277 episodes taped over 9 seasons of the show, all listed nicely by episode number within the interface. Just select the play button on the episode you want to watch, and you’re set to go.
Tablo Dual HDMI Cost
There are a couple of things to take into account when it comes to the cost of the Tablo DVR. First, there is the cost of the device itself, and then there is the cost of the premium subscriptions for TV Guide Data Service and Premium Service (Automatic Commercial Skip). Personally I think the TV Guide Data Service subscription, which gives you 2 weeks of live TV data and other advanced DVR features is crucial. I wouldn’t love Tablo as much as I do without it.
The Automatic Commercial Skip we do without because it’s almost as easy just to fast forward through commercials viewing the video thumbnails.
Here is the pricing for the Tablo devices, and for the premium subscriptions.
Tablo Device Cost
There are currently 6 Tablo devices that you can purchase with varying features, onboard storage, connectivity and number of tuners. They include the 2 HDMI connected devices:
- Tablo Dual HDMI OTA DVR: $149.99
- Tablo Quad HDMI OTA DVR: $199.99
There are 4 network-connected Tablo devices, all with either 2 or 4 tuners. Two of them also have some limited onboard storage.
- Tablo Dual Lite OTA DVR: $149.99
- Tablo Dual 128GB OTA DVR: $169.99
- Tablo Quad OTA DVR: $199.99
- Tablo Quad 1TB OTA DVR: $239.99
The device we received and are reviewing cost $149.99.
NOTE: The Tablo online shop often sells refurbished Tablo units for a big discount. Our original networked Tablo was a refurbished unit when we received it. It’s going on 7 years strong now. Recommend checking it out if you’re looking for a cost savings.
Tablo Subscription Costs
There are two service subscriptions available for all devices, TV Guide Data Service and Premium Service (Automatic Commercial Skip). Both services have monthly or annual billing plans.
So what do you get with the TV Guide Data Service?
- 14 days of guide data
- Rich cover art
- Series and episode synopses
- Schedule recordings by time, episode or series
- Schedule full series recordings
- Advanced recording settings
- Filters to view content by type, genre, etc.
In my mind the full featured guide is well worth the cost, and I sprang for the lifetime subscription years ago (although it was a bit cheaper then). Unfortunately the HDMI devices don’t have the option of a lifetime subscription currently.
TV Guide Data Cost
So what is the cost?
- Monthly: $4.99
- Annual: $49.99
- Lifetime: $179.99 for network connected devices only.
If you choose to forgo the guide data subscription, you’ll only get 24 hours of a basic live TV grid guide, and scheduling programs will be a manual process similar to an old fashioned VCR, setting it to record at a certain time and day.
Premium Service (Automatic Commercial Skip) Cost
There is a “Premium Service” add-on that gives you Automatic Commercial Skip functionality. It also has monthly or annual payment plans.
- Monthly: $2.00
- Annual: $20.00
There is no lifetime plan for commercial skip.
Tablo Dual HDMI Pros And Cons
So what are the pros and cons of this particular Tablo device?
Pros
There is a lot to like about the Tablo devices, and in particular about the Dual HDMI device.
- Direct HDMI connection to your TV, which is great if you mainly watch on 1 TV.
- Watch TV in the high-quality native MPEG2 – 1080i HD, not a compressed stream.
- Ability to expand storage up to 8TB.
- Watch, pause or record live TV.
- Stream to other compatible TVs in the home.
- Live TV grid guide that gives rich information about every TV show, movie or sporting event, including cover art.
- Ability to record entire series of shows, only new airings, or record all of a certain show.
- The HDMI versions of Tablo DVR comes with a remote.
- 5.1 Surround Sound support.
- Ethernet or WiFi connections available.
Cons
There are a couple of things with the HDMI connected Tablo devices that are less than ideal.
- No out-of-home streaming to mobile devices, Tablo apps or computers for HDMI Dual or Quad devices. Only network connected Tablo devices have this functionality.
- In-home streaming only via Fire TV, Roku or Android TV devices. No PC, Mac or mobile device streaming.
- No option for lifetime TV guide subscription. You can only get that with the network connected devices.
- No on-board storage, needs an external hard drive.
The cons of the HDMI devices are easily overcome by just buying one of the network connected devices as they don’t have the same limitations. If you’re going to be watching on more than 1-2 TVs, I’d recommend doing that.
Tablo Dual HDMI – A Capable DVR For Cord Cutters
As a long time owner of the network connected Tablo over-the-air DVR, I’m a big fan of their products.
The Dual HDMI DVR that we received to review has a lot to like about it. It has a lot of the same great over-the-air DVR functionality as the originals, but it also comes with the ability to connect the device directly to your TV via HDMI, as well as giving you a remote to control the device. It also allows you to watch the TV broadcast in the native MPEG2 broadcast signal, ensuring the highest quality video stream.
The only downside for some is that the Dual HDMI device doesn’t offer out-of-home streaming, and only offers limited at-home network streaming. If you have a lot of TVs and devices to stream to at your house and on-the-go, it may make this device a non-starter. You may want to look at one of Nuvvyo’s network connected devices.
On the other hand if you’re using this device only on 1 or 2 TVs, or as a secondary device at a cabin or lake home, it might be just what you’re looking for.
Check out Nuvvyo’s full line of over-the-air Tablo DVRs at their site. We highly recommend their products, and will continue using them as our main over-the-air DVRs.
